
How to connect your Olasty store to Stripe
This post was updated on November 26, 2025
In this guide, you’ll connect your Olasty store to your own Stripe account so you can start accepting payments directly from your customers. Before you begin, make sure you have an active Olasty store and an active Stripe account. The process takes just a few minutes and gives you full control over your billing, payouts, and financial data.
What is Stripe?
Stripe is a powerful payment platform that allows you to accept online and in-person payments from customers around the world. It provides secure checkout flows, fraud protection, and direct payouts to your bank account.
If you are in a supported country, you can sign up as an individual or a business and start accepting payments quickly.
For the rest of this guide, we will assume that you already have an active Stripe account.
Understanding test vs live mode
Olasty requires both your live and test Stripe keys to function correctly. When your store is in test mode, Olasty creates test orders and Stripe processes test transactions inside its test environment. This means you can walk through the entire checkout and fulfillment flow without any real money being charged.
It is the safest way to validate your overall order experience before going live. Once everything has been verified, you can switch your store to live mode directly from the Olasty dashboard.
About Stripe sandboxes
A Stripe sandbox is a test environment that mimics the live environment and allows you to safely test integrations without creating real-world effects. You can create and delete sandboxes at any time.
Start by creating a new test sandbox:

- In your Stripe main dashboard, click your name in the top left corner and navigate to Switch to Sandbox > Create Sandbox.
- Keep the default Copy your account option selected, then click Create Sandbox.
To navigate back to your main environment:
- Click your name in the top left corner.
- From the dropdown, select Exit Sandbox.
To navigate back to the sandbox:
- Click your name in the top left corner.
- From the dropdown, select Switch Sandbox > Your Sandbox.
All steps below are identical for both the live and test environments. Each step must be completed twice, once in each environment.
Getting your Stripe API keys
While in your sandbox environment, follow these steps:
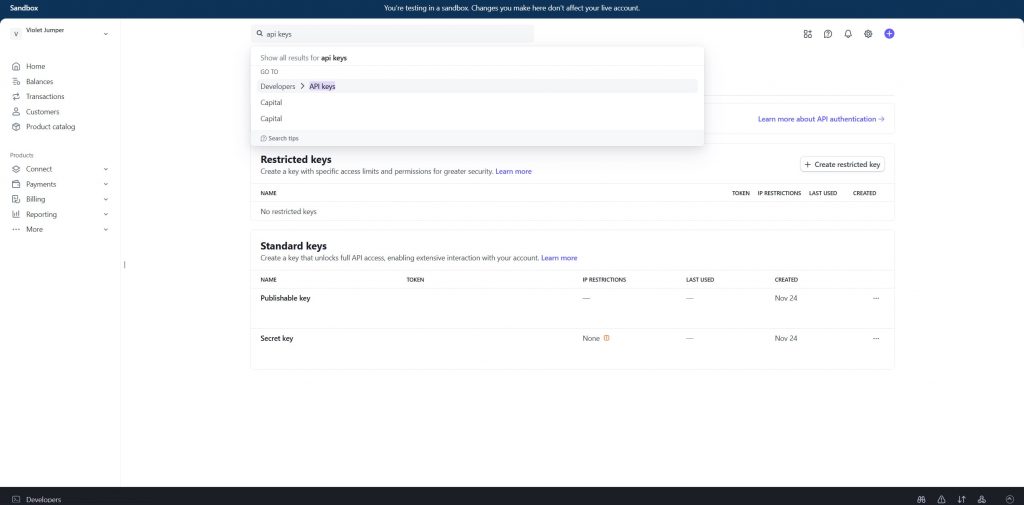
- In the top search bar, type API Keys and select Developers > API Keys.
- On the next page, click Create Restricted Key.
- Select Providing this key to another website and click Continue.
- In the next screen, enter the following details:
- Name: Olasty
- URL: https://olasty.com
- Leave Customize permissions for this key unchecked.
- Click Create restricted key.
- Save your API key for Olasty and Publishable key.
Note: You will also see a third key labeled Secret key. Never use this key. It provides unrestricted access to your Stripe account. Olasty only requires a restricted key and your publishable key.
Now that you have the keys for the test environment, repeat steps 1 to 6 in the live environment.
Connecting your Stripe account to your Olasty store
Once you have all four keys, navigate to your Olasty dashboard and follow these steps:
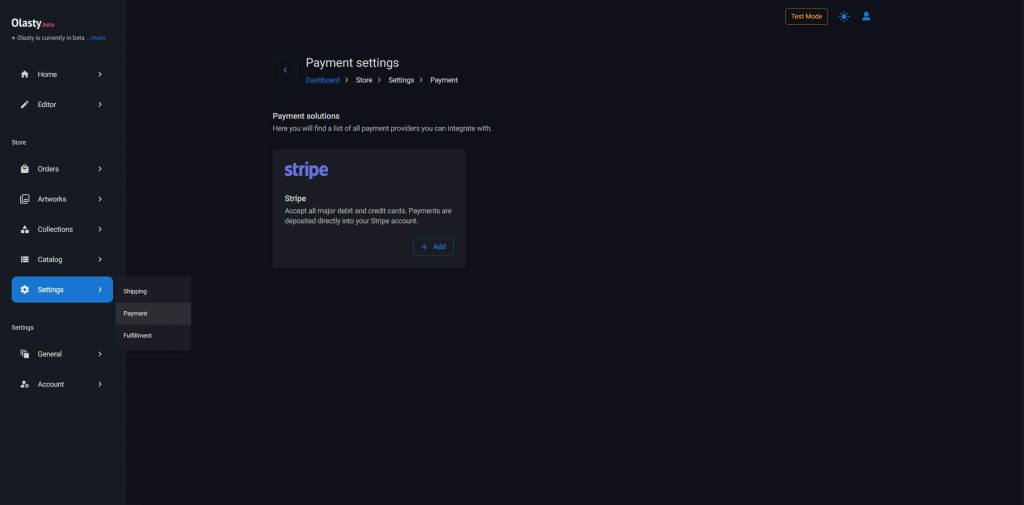
- Go to the Payment methods page from the sidebar: Store > Settings > Payment.
- Click the Add button inside the Stripe card.
- In the modal, paste all four keys and confirm.
That is it. Your Olasty store is now connected to your Stripe account, and your customers can pay you directly.
Olasty creates a webhook in your Stripe account to track when a payment is processed and confirmed. This is required to reflect the correct payment status and details on your orders. Do not edit or delete this webhook from Stripe. Doing so will cause payments to go out of sync.
If you want to remove the integration, delete it from your Olasty dashboard instead. Olasty will automatically remove the webhook from your Stripe account.
Please note that once your Stripe account is connected, you will not be able to view or edit your keys from the Olasty dashboard. This is an intentional security measure. If you need to update your keys, delete the integration and create it again using the new keys.
Focus on achieving your business goals, we will handle the technical side of things.
Olasty's goal is to make it easier for you to sell your art online. We provide you with the tools and technologies you need during your journy so you can add amazing features to your website with minmal cost and effort.